안녕하세요! 프로나인 입니다!
휴가철인데도 날씨가 선선하면
이번에 폭우가 쏟아지면서 홍수 난 지역들이 많은데 큰 피해가 없으시길 바랍니다.. ㅠㅠ
오늘은 SharedPreferences를 이용해서 어떻게 로그인 화면에 아이디 저장, 비밀번호 저장 기능이 만들어지는지 알아보려고 합니다! 안드로이드 개발하면서 아주 유용하게 쓰이는 기능 중에 하납니다!
SharedPreferences 란?
안드로이드 개발을 하다 보면, DB에 데이터들을 저장해야 하는 경우가 많이 생기는데요.
위에 말했듯 로그인 화면에 아이디 저장, 비밀번호 저장하는 행위는 DB에 데이터들을 저장할 필요가 없고 내부적으로 저장을 하면 될뿐더러 혹여 내부 DataBase(Room, mssql)를 사용하면 또 간단한 것을 저장하기엔 부담스러운 상황이 생기기 마련입니다.
이런 것을 좀 더 쉽게 저장할 수 있도록 안드로이드에서 기본적으로 제공되는 SharedPreferences를 사용하여 데이터를 관리할 수 있습니다!
SharedPreferences는 데이터를 파일로 저장하는데, 이 파일은 앱 폴더 내에 저장되므로 앱을 삭제하면 당연히 데이터 파일도 삭제가 됩니다.
파일 경로 = data/data/(package_name)/shared_prefs/SharedPreference
xml 구성
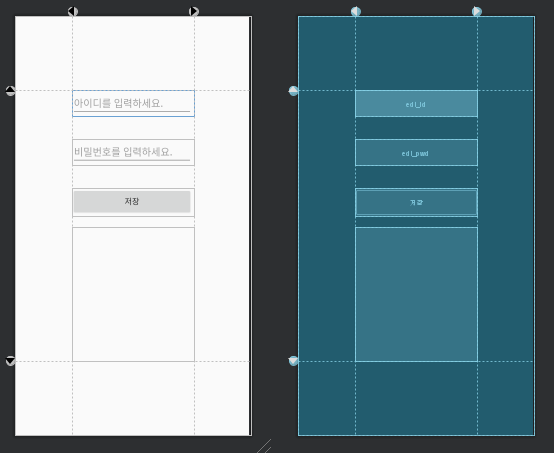
로그인 화면과 유사하게 만들어 볼 것입니다. 필요한 코드만 쏙쏙 빼가세요!!
<?xml version="1.0" encoding="utf-8"?>
<androidx.constraintlayout.widget.ConstraintLayout
    xmlns:android="http://schemas.android.com/apk/res/android"
    xmlns:app="http://schemas.android.com/apk/res-auto"
    xmlns:tools="http://schemas.android.com/tools"
    android:layout_width="match_parent"
    android:layout_height="match_parent"
    tools:context=".MainActivity">

    <androidx.constraintlayout.widget.Guideline
        android:id="@+id/guideline_left"
        android:layout_width="wrap_content"
        android:layout_height="wrap_content"
        android:layout_marginStart="100dp"
        android:layout_marginLeft="100dp"
        android:orientation="vertical"
        app:layout_constraintGuide_begin="100dp"
        app:layout_constraintStart_toStartOf="parent" />

    <androidx.constraintlayout.widget.Guideline
        android:id="@+id/guideline_top"
        android:layout_width="wrap_content"
        android:layout_height="wrap_content"
        android:orientation="horizontal"
        app:layout_constraintGuide_begin="130dp" />

    <androidx.constraintlayout.widget.Guideline
        android:id="@+id/guideline_right"
        android:layout_width="wrap_content"
        android:layout_height="wrap_content"
        android:orientation="vertical"
        app:layout_constraintGuide_end="100dp" />

    <androidx.constraintlayout.widget.Guideline
        android:id="@+id/guideline_bottom"
        android:layout_width="wrap_content"
        android:layout_height="wrap_content"
        android:orientation="horizontal"
        app:layout_constraintGuide_end="130dp" />

    <EditText
        android:id="@+id/edt_id"
        android:layout_width="0dp"
        android:layout_height="wrap_content"
        android:inputType="text"
        android:hint="아이디를 입력하세요."
        app:layout_constraintLeft_toRightOf="@id/guideline_left"
        app:layout_constraintRight_toRightOf="@id/guideline_right"
        app:layout_constraintTop_toTopOf="@id/guideline_top" />

    <EditText
        android:id="@+id/edt_pwd"
        android:layout_width="0dp"
        android:layout_height="wrap_content"
        android:layout_marginTop="40dp"
        android:inputType="text"
        android:hint="비밀번호를 입력하세요."
        app:layout_constraintLeft_toLeftOf="@id/guideline_left"
        app:layout_constraintRight_toRightOf="@id/guideline_right"
        app:layout_constraintTop_toBottomOf="@id/edt_id" />

    <Button
        android:id="@+id/btn_save"
        android:layout_width="0dp"
        android:layout_height="wrap_content"
        android:layout_marginTop="40dp"
        android:text="저장"
        app:layout_constraintLeft_toLeftOf="@id/guideline_left"
        app:layout_constraintRight_toRightOf="@id/guideline_right"
        app:layout_constraintTop_toBottomOf="@id/edt_pwd" />

    <TextView
        android:id="@+id/tv_result"
        android:layout_width="0dp"
        android:layout_height="0dp"
        android:layout_marginTop="20dp"
        android:gravity="center_horizontal"
        android:textStyle="bold"
        app:layout_constraintBottom_toBottomOf="@id/guideline_bottom"
        app:layout_constraintLeft_toLeftOf="@id/guideline_left"
        app:layout_constraintRight_toRightOf="@id/guideline_right"
        app:layout_constraintTop_toBottomOf="@id/btn_save"/>


</androidx.constraintlayout.widget.ConstraintLayout>

SharedPreferences 사용하기
public class MainActivity extends AppCompatActivity {
    private TextView tv_result;
    private EditText edt_id, edt_pwd;
    private Button btn_save;
    private SharedPreferences preferences;

    @Override
    protected void onCreate(Bundle savedInstanceState) {
        super.onCreate(savedInstanceState);
        setContentView(R.layout.activity_main);

        tv_result = findViewById(R.id.tv_result);
        edt_id = findViewById(R.id.edt_id);
        edt_pwd = findViewById(R.id.edt_pwd);
        btn_save = findViewById(R.id.btn_save);

        //getSharedPreferences("파일이름",'모드')
        //모드 => 0 (읽기,쓰기가능)
        //모드 => MODE_PRIVATE (이 앱에서만 사용가능)
        preferences = getSharedPreferences("UserInfo", MODE_PRIVATE);

        //버튼 이벤트
        btn_save.setOnClickListener(new View.OnClickListener() {
            @Override
            public void onClick(View v) {
                //Editor를 preferences에 쓰겠다고 연결
                SharedPreferences.Editor editor = preferences.edit();
                //putString(KEY,VALUE)
                editor.putString("userid",edt_id.getText().toString());
                editor.putString("userpwd",edt_pwd.getText().toString());
                //항상 commit & apply 를 해주어야 저장이 된다.
                editor.commit();
                //메소드 호출
                getPreferences();
            }
        });
    }
    //Preferences에서 꺼내오는 메소드
    private void getPreferences(){
        //getString(KEY,KEY값이 없을때 대체)
        tv_result.setText("USERID = " + preferences.getString("userid","")
        + "\n USERPWD = " + preferences.getString("userpwd",""));
    }
}
주석과 버튼 이벤트 때문에 헷갈려 보이실지 모르겠지만 정리해서 보면 정말 간단합니다.
SharedPreferences preferences = getSharedPreferences( "파일 이름(테이블 이름)" , MODE값);
SharedPreferences.Editor editor = preferences.edit();
editor.putString(KEY, VALUE);
editor.commit();
4줄이면 preferences를 사용할 수 있는 모습을 볼 수 있습니다
위에 예시로는 putString(KEY, VALUE)를 쓰긴 했지만
아래와 같이 여러 가지 데이터들을 넣을 수 있습니다!

그리고 항상 마지막에 commit() 또는 apply()를 해주어야 preferences에 저장이 되니까 꼭!!! 주의하세요!
그럼 이제 저장된 값들을 불러올 차례입니다!
String value= preferences.getString(KEY, defValue);
KEY는 PUT 했을 때의 KEY 값이고,
defValue는 해당 키값이 존재하지 않을 때 대체되어 나올 값을 지정하는 겁니다.
SharedPreferences 결과

저장 버튼을 누를 때마다 데이터를 저장하고 그 밑에 TextView에 데이터를 가져와서 뿌려주는 모습을 볼 수 있습니다!
SharedPreferences를 응용하면 아이디 저장, 비밀번호 저장 기능을 만들 수 있습니다!
차후에 추가적으로 응용한 로그인 화면을 구상하여 올려두도록 하겠습니다~!
코드 & 참조
GitHub - 전체 코드
https://github.com/Koo-hee/Android-sharedpreference
Koo-hee/Android-sharedpreference
Contribute to Koo-hee/Android-sharedpreference development by creating an account on GitHub.
github.com
참조 - 안드로이드 Developer
https://developer.android.com/training/data-storage/shared-preferences?hl=ko
키-값 데이터 저장 | Android 개발자 | Android Developers
저장하려는 키-값 컬렉션이 비교적 작은 경우 SharedPreferences API를 사용해야 합니다. SharedPreferences 객체는 키-값 쌍이 포함된 파일을 가리키며 키-값 쌍을 읽고 쓸 수 있는 간단한 메서드를 제공합�
developer.android.com
'안드로이드 > JAVA' 카테고리의 다른 글
| [JAVA] StringTokenizer 사용법 (2) | 2020.08.27 |
|---|---|
| [JAVA] 안드로이드 HashMap 사용하기 (0) | 2020.08.20 |
| [JAVA] JSON의 getAsString 과 toString 의 차이!! (1) | 2020.07.30 |